
|
Experiments |
The Experiment Designer Panel presents a hierarchical view of the experiments. The root event of these hierarchical structures is always an Experiment event.
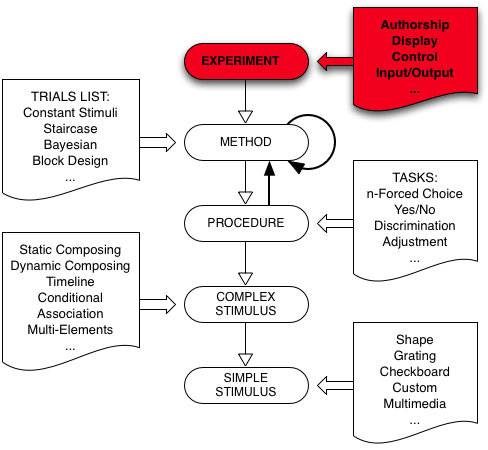
To create a new experiment, make sure to deselect any event by clicking on an empty row or ⌘-clicking on the selected event to deselect it, then:
After creating a new experiment event, you
should specify the following properties:
Authorship
Display
Control Settings
Input/Output
These properties can be edited at any time by selecting the Experiment event and clicking the Inspect button in the bottom toolbar (or pressing ⌘I).
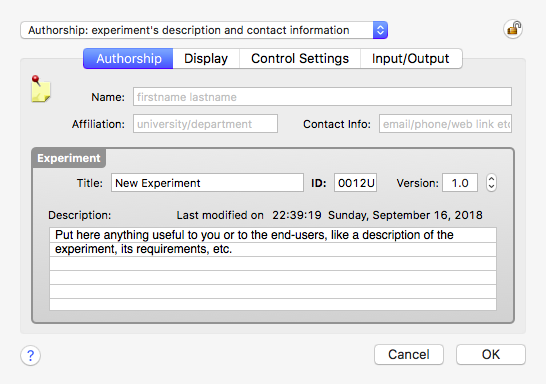
The Authorship settings should provide information concerning:
the experimenter's identity, contact information (e-mail, phone, etc.), and affiliation. This information may be useful if you disseminate your experiments to co-workers. It is also used when creating an experiment report.
the experiment's title, ID, version and description. The title should be set by editing the Experiment entry directly in the Designer Panel. Note the presence of the date of the last modification made. The experiment ID should be a unique 5-letter identifier but is automatically generated by default if you don't specify one.
The Display settings specify all information required to properly present your stimuli on a calibrated display during the experiment. By default, these settings are the ones defined in the Display Preferences (click on the Display icon in the top left-hand corner to reset the experiment display settings to the default ones).
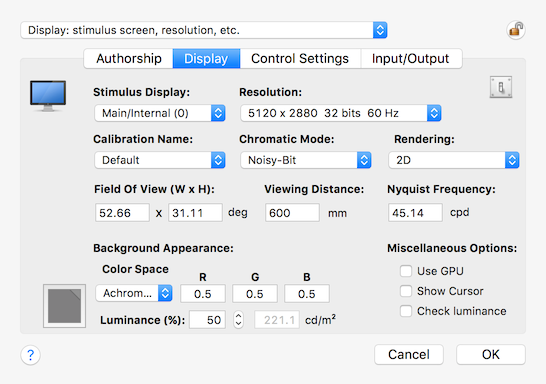
These settings are:
the stimulus display. The main display is referred to as "Main/Internal (0)". The number between the parentheses is the display index provided by the operating system. If a second display is available, it appears in the pop-up menu as "External (1)", and so on.
the display resolution in terms of pixel size, bit depth, and frame rate. The color of the resolutions in this pop-up menu indicates whether there are up-to-date calibrations (black), only expired calibrations (blue), or no calibration at all (red) available for each of these resolutions.
the name of the calibration. The pop-up menu presents all calibration configurations set for the specified display and resolution settings (by default, the first one is selected). The color of the calibration names in this pop-up menu indicates whether there are up-to-date (black) or expired (red). Calibrations are created and managed in the Calibration Panel.
the chromatic mode that best fits your experimental requirement (typically achromatic or color, see Defaults preferences for more details about the available options).
the rendering mode (typically 2D or one of the stereo modes, see Defaults preferences for more details about the available options).
the horizontal and vertical fields of view (FOV) expressed in degree of visual angle.
the viewing distance in millimeters.
the maximum spatial frequency (SF) in cycle per degree.
the default background color during the experimental session. The background color is specified the same way as for visual stimuli (see common properties). The associated background luminance based on the calibration configuration is also indicated in cd/m^2.
miscellaneous options:
the Show cursor check box to indicate wether to show or hide the mouse pointer on the experimental display during a session.
the Check luminance check box to perform a background luminance measurement at the beginning of the session using one of the supported photometers/colorimeters and specified in the Calibration Panel. The session will automatically abort if the measured luminance differs by more than 10% from the expected luminance measured at calibration time. In that case, you should check and recalibrate your display. Note that this option only applies in fullscreen mode.
the Use GPU check box (available in Psykinematix v2.0 and above only) to indicate whether stimuli should be generated on-the-fly using the graphics card's GPU whenever possible for this experiment (disabled option if already enabled in Timing Preferences).
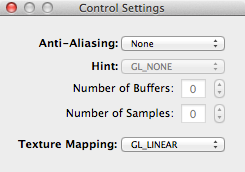
some OpenGL anti-aliasing options are available by clicking the switch button in the top-right corner of the Display properties panel. It is important to note that the quality of the anti-aliasing is highly dependent on the graphics card and that it may affect the presentation timing depending on the complexity of the stimuli.
Note that changing the fields of view, viewing distance or maximum spatial frequency automatically updates the other parameters based on the geometry calibration.
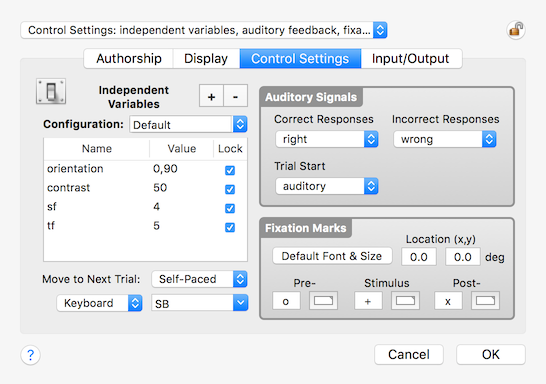
The Control settings specify some important aspects of the experiment:
A table provides a list of controlling parameters that act as independent variables in the experiment design. Some are pre-defined (locked) and cannot be changed, and some others (unlocked) can be customized for each subject in the "Session Information Panel" presented at the start of the experiment (the current values of these subject-specific parameters can also be found in the Subjects Panel). Independent variables can be added or removed with the '+' and '-' buttons. See the "Variables" section for more information about possible values for the controlling parameters.
Several lists of experimental parameters can be specified through configurations. Configurations allow to rapidly switch between different experimental conditions. Configurations can be added or removed by control-clicking the '+' (duplicate the current one) and '-' buttons. There is always a 'Default' configuration which can be renamed but not removed. The configuration to be used at run-time can be selected from the "Session Information Panel" presented before running a session in fullscreen mode.
Auditory signals can be specified for two different circumstances: when the subject provides correct/incorrect responses, or at the start of each trial.
A fixation mark can be displayed pre-stimulus, post-stimulus or during the stimulus presentation. The character and the color used for each fixation mark can be specified (leave blank to select no fixation mark). The appearance of the fixation mark can be further customized by specifying its font and size (default is Times-Roman 24 points). The x,y coordinates of the fixation location can be also customized where (0,0) deg refers to the display center. Note that it is possible to indicate up to 2 stimulus fixations (eg, AB) which duration and probability of changes are specified by the system-defined independent variables FIXDURATION (in seconds) and FIXPROB (in [0-1] range) respectively. This can be used to introduce a fixation task (change detection) to control for attention in experiment where a succession of stimuli are presented: the built-in dependent variable [FIXCHANGED] which is automatically set to 1 when the fixation changes from one trial to the next can then be used as the stimulus correlated expression in a Yes/No procedure.
How the next trial is triggered:
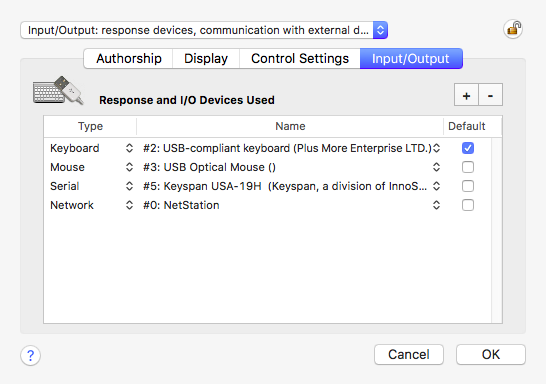
The Input/Output settings specify what devices should be used in the experiment and which ones should be used as the default for each category. If none are specified, the main keyboard is used during the experiment (the main keyboard is the one checked “active” and “default” in the Response Devices Preferences ).
© 2006-2024 KyberVision Japan LLC. All rights reserved.